Lets Blink is a going to be your first ever project to make a LED blink. That is, ON and OFF ….ON and OFF…. and make it go on forever.
This is the most basic activity, but get us started to the world of physical computing.
To get started we will need an Arduino (Uno or whichever one you have that would not make a difference). But ideally as the number of pins increase on our Arduino boards the capability is higher and better projects can be built.
Don’t know Arduino yet? Click here to learn about the Pins and other ports available on it.
Things Needed
- Arduino Uno
- USB Cable from the Arduino Kit
- LED (Light Emitting Diode)
- Buzzer
- mBlock or Arduino IDE on your computer
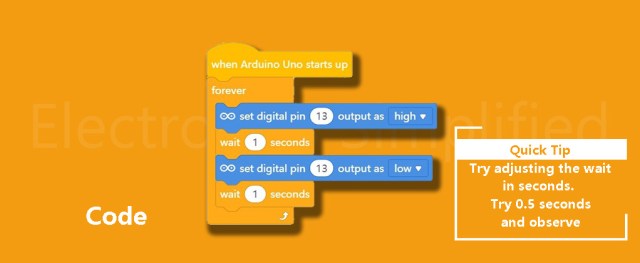
Lets Code
Let us understand the code. We want to turn a LED on and off, so we need to assign a task to connect and disconnect our circuit. So we make our Pin 13 High and Low. High means ON and Low means OFF. And we run this process forever after we turn the Arduino is switched ON.

Learn to add Arduino on mBlock
Connect the Circuit

After you finish connecting the above circuit. Connect the Arduino to the Computer and select your COM port on mBlock or any visual programming language that you are using. Upload the Code to the Arduino and witness your first Arduino project working.
Watch the tutorial on how to add the Arduino on mBlock and selecting your COM port all with a few mouse clicks. You can also refer to Getting Started for Visual Coding with Arduino
To purchase any of the required components in the activity. Click on the images below for best offers and products.

One Reply on “Lets Blink with Arduino using mBlock”